After what I call a successful build on my Mercury Mark 58AH that is currently powering Dave Samstag’s red Marchetti Hydroplane, I wanted to take all of the build information I had learned from Jerry Wienandt(44ci racing Merc guru out of Stockton, WI) and apply my newly learned skills towards another motor build. Repetition will help me retain this new found knowledge over the long haul. I became connected with Jerry after a disasterous beginning to my original Mark 58AH project, which is another long story within itself. But to stay on track, though a lot of “issues” in the beginning, Jerry set me straight and we decided to start over from scratch so we knew what we were working with. Those of you who have attended a Lake LBJ or Lake Catherine wet meet can attest to how well that 58AH motor runs.
FIrst things first, what is a Mercury Challenge Series? It was a 3 year period from 1986-1988 where Mercury was promoting their brand. Mercury was in process of building their 44xs racing motor and the 25xs(25ss replacement) had just come out. Mercury put up $20,000 -$24,000 in prize money, depending on year, for racers to paint their Mark 30H and 55H racing motors all black in an effort to build hype for the newest generation of D Stock racing motors, the 44xs. Racers also needed to buy a new wrap around cowling from Mercury with the modern, multicolored racing stripes through the band and lettering to make it look like the new 44xs that was in process of being built. As I understand it, this multicolored wraparound was $30 from Mercury Hi-Performance at the time. Here a few YouTube video links with some clips from the 3 years of the Challenge Series:
1988 Mercury Challenge – Placing 3rd overall is Jerry Wienandt (3-W)
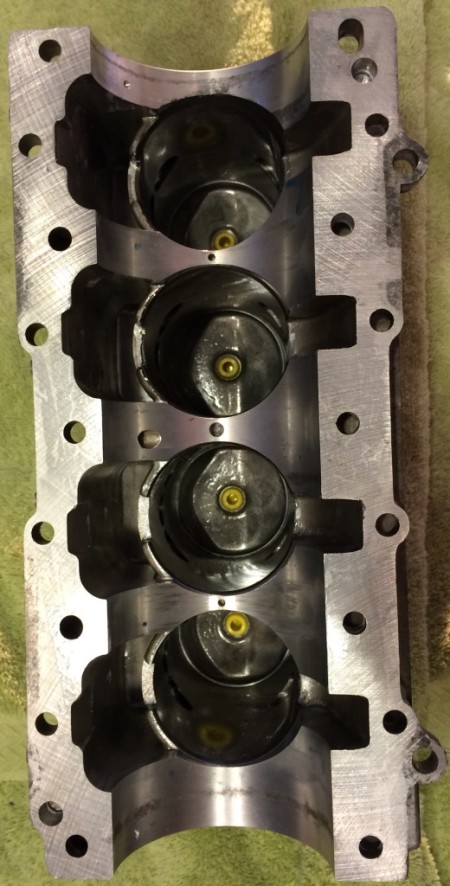 Now on with the build…I first had to find a nice, fresh block to start with and many thanks to my dad, Dave Samstag, who literally stumbled across a low hour Merc 400(44ci block) near Springfield, Missouri while visiting relatives on vacation. Next step was to totally disassemble the powerhead and determine what the internals look like. As Jerry would tell me, “Yogi those parts really well; you can tell a lot by looking. You are building a race motor that will perform at or above 7,500 rpms. Problems are amplified at higher rpms so you want to use only the best parts you possibly can. Pay now or pay again later.” Once the powerhead was apart, I began reviewing and inspecting every internal part, including each individual needle bearing, for any “dark pits/spots” which is evidence of rust, or bluing from overheating. If I found any defects of such, in which I did, they were replaced with ones that were shiny, new in appearance, but not new. Since I planned on having some exhaust port work done and the cylinders honed, I elected to install four NOS Mercury 44xs 2 ring, keystone style pistons instead of going back with the factory 3 ring pistons that came out of the motor. The 44xs pistons are large pin pistons so my search began for 4 large end connecting rods of similar weights. I also planned to install 44xs style reed cages because they have larger reed openings than the standard Merc 400 reed cages. It is all about the flow don’t ya know. So while I was searching for these parts on the ol’ interweb, I was diligently working on stripping the old white paint off of the block as well as removing all of the carbon buildup on the exhaust cavity to prepare it for porting.
 Once this cleaning and prepping was complete, I began my conversion to add an upper crank roller bearing oiler to ensure it remains lubricated. Mercury blocks in this era used a CMB(center main bearing) oiler, but no upper oiler. Without proper lubrication, these upper bearings fail over time and potentially ruin crankshafts or even your block if the bearings come apart while running. It wasn’t until the later generation blocks(1980’s) did Mercury do some reengineering to incorporate these upper oilers. The theory behind the upper oiler is to flow oil to the top of the crank, pass the oil through the upper bearing to lubricate it, then let gravity take care of the rest on the way down. By making this conversion, some drilling into the block is required as well as some Dremel tool work to the upper bearing housing as well as the CMB. The CMB will be lubricated from the excess oil coming off the #2 cylinder.
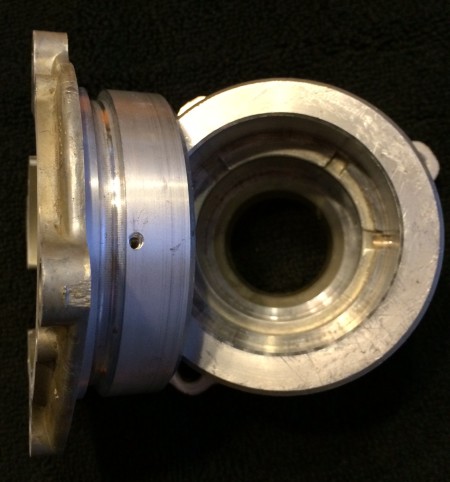
While all of this is going on, I was able to locate the large end connecting rods similar in weight and with no rust(dark pits) or bluing as well as a couple 44xs style reed blocks. The prep work needed on the connecting rods was to “straighten” them out and to make them consistent in thickness from end to end and connecting rod to rod. How you do straighten the connecting rods? By sanding them on a flat granite surface stone stroke by stroke, measuring regularly. Your objective is to have similar overall measurements so when the pistons are installed with the spacers, your measurements between all cylinders are within a few thousandths of each other. Same for the crank end measurements. 
 The new reed cages needed to be prepped as well. Using the same granite surface stone, the flat surface of the reed blocks were “sanded” on both sides to create a cross hatch effect, 90 degrees of each other using the same number of sanding strokes each direction. This scuffing of the surface allows oil to sit in the grooves to keep the reeds from “sticking”.
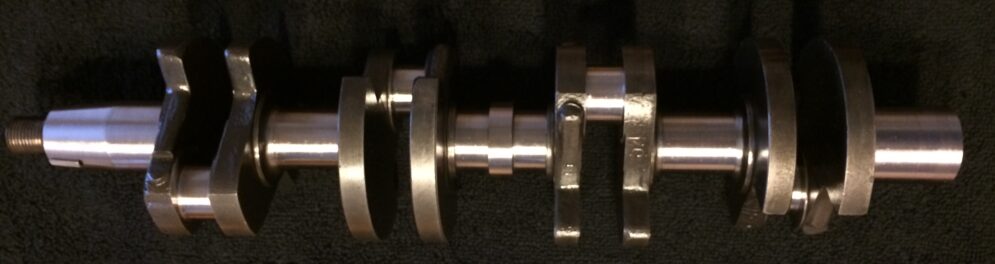 Next step was to verify the straightness of the crankshaft and to ensure the upper end where the bearing rides did not have any “flat spots” opposite from the throw from years of running creating a flat spot from the #1 cylinder. After calipering and measuring for trueness on a dial indicator, I determined I had a very good crank with measurements reading less than .001 run out on this crankshaft. Mercury’s tolerance is less than .005. The upper and lower end was almost perfect with only a slight needle movement barely moving off the starting mark. As with the connecting rods, I needed to prep the crank journals to ensure they were clean and consistent in size from the top journal to the bottom one by taking multiple measurements on each journal 90 degrees from each measurement. The reasoning the journal sizing is so important is because I was going to hone the crankshaft end of the connecting rods and I had to have a consistent measurement to provide to the machinist. The reason I was honing the connecting rods is because Mercury tightened up the tolerances after the early Mark 55’s came out because they were too “loud” for the everyday user. Once they tightened up the tolerances, it quieted the motors down, but also created excess heat and stress on the internals. This is why when you crack open many motors, the bearings, connecting rod ends and sometimes the crankshafts have a blued look to them. Once the crankshaft was done being prepped, I performed a basic static flywheel balance to ensure the modified racing flywheel was in balance with the crankshaft.
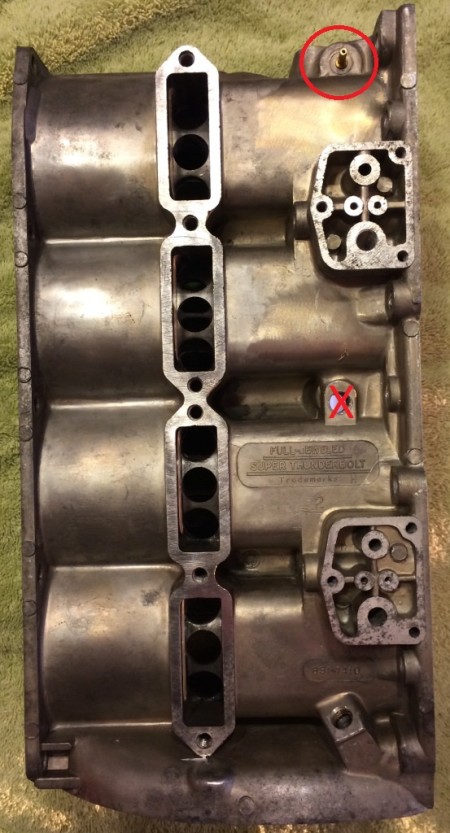
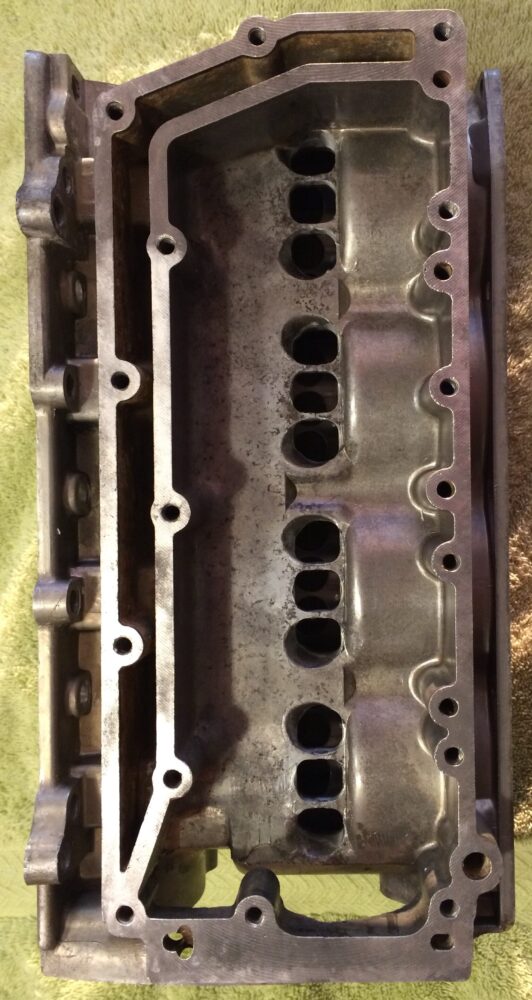 Now all of the parts are prepped and ready for machining, I sent the block, 4 connecting rods, 2 reed cages and the center main bearing(CMB) to Mag Machine Services in Wisconsin, formerly Ruck Machine Services for the honing and porting work per my specifications, using Jerry’s authorized port specifications. As you can see pictured, the port work that was done squared off the ports vs the factory rounded ports. This change creates more flow of the exhaust out of the block as well as alters the piston timing.
While parts were at the machine shop, I was busy stripping, prepping, priming and painting the cowlings, tower and clamp assembly as well as the gearcase. I was able to locate an old used Challenge Series wrap, but it needed to be restored to compliment the rest of the components. Being able to remove the decal off the cowling wrap, I was able to work with Peter McDowell in Canada to create a new reproduction decal. The old decal with the freshly painted motor just did not look good enough for my liking. The trickiest part of the painting process was the faceplate. Due to the fact the Challenge Motors had to be all black and a regular Merc 400 faceplate was mostly chrome, I decided to take an unconventional approach with this chrome Merc 400 faceplate and do a reverse image(a negative in film photography terms). Instead of just painting it all black, I wanted to have some of the chrome for highlights, so I masked off the Merc 400 wording and chrome bars and chevrons. I then decided to paint the water jacket on the back of the block an orange color as a tribute and reminder to me of Jerry Wienandt. This orange color was Jerry’s team racing color as well as a “signature” marking on the powerheads he has built over the years for other people. Although he physically did not build this motor nor any today, he was right in the middle of it with me via email communication on updates, progress or to answer any questions I may have had.
 Once the parts came back from the machine shop, I assembled the block and attached the carbs, magneto etc prior to mounting it on the tower. I then mounted the powerhead to the tower/gearcase and made all the necessary connections and set the timing. I hope to fire it off when the weather warms to begin the break-in procedure.
 A special thanks to a few people is in order on this project: To my wife Dawn for supporting me and this crazy hobby(addiction) I am a part of; little did you know what you were getting into. To my dad, Dave, for introducing me to old Mercury’s back in the mid 80’s and for the patience everytime I broke your old KG7Q. I think I found all the weak spots in that motor and glad to say they are all fixed! Lastly, to Jerry. I knew how to put motor together and get it to run, but you taught me how to build one the “right way”, make it fast while keeping it together. The Mark 58AH is validation for all that you have taught me.
Below are a couple of pictures of the Challenge Motor as well as my first build, the Mark 58AH. I call these two Ying Yang.
– Doug Samstag


